JOINTS TAB
The Joints Tab gives you access to all the operations you can perform with the joints of your current model. The Joints Tab buttons may be active or dimmed. If the button's function is not available, the button is dimmed. To activate the buttons you must first select a group from the Joint list.
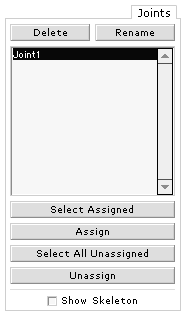
Delete: Delete a selected joint.
Rename: Rename a selected joint. A dialog box will appear where you can enter the new name of that joint.
Group List: Gives you a list of all the joints in your current model.
Select Assigned : Lets you select all vertices assigned to the selected joint. Select a joint in the Joint list and click the Select assigned button.
Assign: Assign selected vertices to the selected joint. First select the vertices you want to assign to a joint using the selection tools in the Tools palette. Then select a joint in the Joint List and click the Assign button.
Select All Unassigned: Select all vertices not assigned to any joint.
Unassign: Clear any joint assignment from currently selected vertices.
Show Skeleton: Check or uncheck to show or hide the joints of your current model.